i am a beginner for pencil shading. you web sit is use full for me. thank you.
You are most welcome 🙂

Learning how to shade using a pencil can make all the difference in your drawing. Shading applies the perfect effect of light and helps create a hint of shadowing making your art look more life-like and adds depth to your art.
There are several factors and techniques used for shading that are quite easy to follow and apply especially if you’re a beginner, but before we get into that, we need to establish first the right pencil to use for shading.
There’s a wide range of considerations to think of when choosing the right graphite pencil to use and add to your collection. Finding the best pencil to bring your art to life can be a bit challenging but, in the end, it all comes down to personal preference.
The first thing you’ll need to think about when choosing the right graphite pencil for the job is your drawing style – whether you like to use dark and thick lines or whether you prefer lighter color shades in your drawings – this helps narrow down your options.
Check our review on best drawing and sketching pencils for beginners.
pencil grading scales – source: https://www.jetpens.com/blog/the-best-lead-grade-for-every-application/pt/475
Understanding the different grades of graphite pencils before getting into the more technical part of shading is essential. Graphite pencils are usually made out of a mixture of graphite and clay which makes pencil strokes smoother. The more clay there is in the pencil, the harder it is, and this makes the stroke lighter.
The hardness or softness of a pencil is made clear by the combination of letters and numbers printed on the end of each pencil.
The HB scale ranges from 9H (hard pencil with light marks) to 9B (soft pencil with dark marks).
The best pencil to use for the general shading is the B. It provides just the right combination of the medium to light shading. You can also use the 2B for a more medium to a darker shade. Both options help you control the lightness and darkness of your art giving it a lively effect.
HB and H pencils are good choices when it comes to light shading. However, I still believe that B pencils are softer and are the best option for shading in general.
Although grades from HB to H and 2H to 5H are harder and easier to use and keep sharp, they don’t give the same shining effect because they have a higher percentage of clay in them.
You should also make sure to keep your hand light while using the HB and B pencils to avoid making a dent in the paper.
If you’re looking for a darker shade than what the B and 2B have to offer than I suggest you consider using the 4B which is a perfect choice for a darker shading effect. For an even darker option, the 6B will definitely do the trick! However, bear in mind that the 6B is very soft and blunts rapidly, so if you want to show more detail into your drawing, I would suggest using a different grade.
Now that you’ve understood the grades of the graphite pencil and the best pencil to use for each shading degree, it’s time to tackle the best and easiest shading techniques for you to play with.
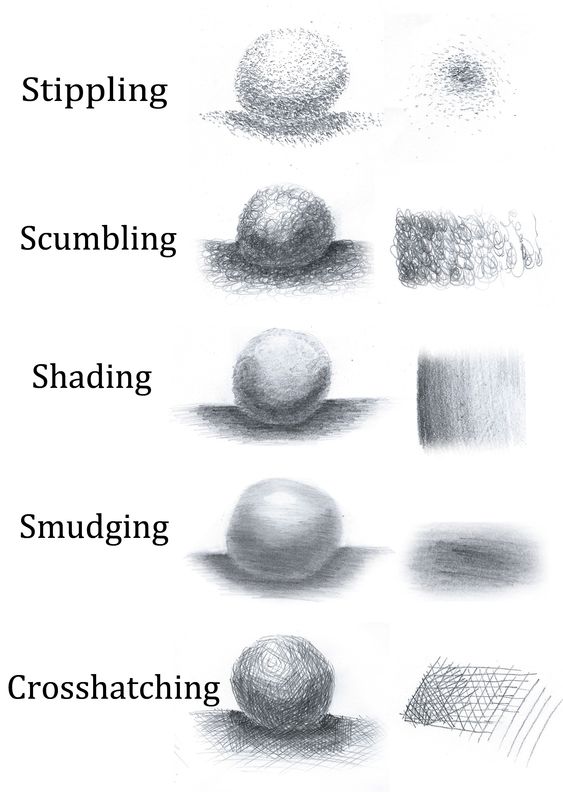
Pencil shading is all about controlling the movement of your hands and deciding whether you’ll be using the point or the side of your pencil because everything you do has a different outcome.

pencil shading techniques illustrated – source: https://www.pinterest.com.au/pin/708050372637760821/
Made out of a series of lines, Hatching can only be achieved by going in one direction and applying parallel lines closer to each other to get an even result. This technique is one of the most common shadings and is perfect for speed drawings. You can easily control the outcome by the amount of pressure you apply and the pencil grade you use.
Tip: make sure to angle your pencil towards the paper to minimize the gaps for thicker and nicer strokes.
Cross Hatching is created by shading in intersecting lines. These lines should crisscross each other and you can be straight, scribbled or circular. The technique of this shading is easy to pull off, if you draw the line with the same spacing, everything then falls into place.
Tip: make sure to avoid holding the pencil the way you would while writing to make it easier for the lines to blend in together making the smooth effect to show.
Here is a video on how to apply cross hatching techniques:
Smooth shading is as easy as it sounds, you just need to make consistent patterns and try to lessen the back and forth movement of your pencil.
Once you’ve managed to maintain consistent pressure for every stroke. To get the shade right it’s important to make your strokes thick and close together.
Tip: Slow your pencil application a little and use a circular motion when shading, this will give you a very successful smooth shade.
This is my personal favorite technique. It helps create a realistic skin texture, fabrics and more. This technique is done by drawing many circles that overlap each other. The more circles you draw the smoother your art becomes.
Tip: use a sharp pencil when you want to give a wrinkled skin effect or use a blunt pencil for a smoother skin effect
It is relatively similar to hatching and cross-hatching techniques, but the lines used in the contour shading are usually curved and can be drawn horizontally, vertically and diagonally.
It’s a little bit harder to master if you’re a beginner as it needs a little bit of visualizing to master.
This is the simplest form of shading. The pressure technique gives a realistic shading to your art. The harder you press the darker your strokes will be which creates the pressure effect.
Check our review on best sketchbooks for colored pencils below. These sketchbooks work well for graphite pencils too.
Pencil shading plays a huge role in making your art more realistic. Practice is the best way to get better at shading.
Once you’ve mastered these few major techniques your art will stand out and you’ll add a little life to your drawings. You’ll be amazed by what a simple tool such as a pencil can do to your artwork!
Don’t forget to see our articles on best sketching pencils and best pencil sketchbooks!
i am a beginner for pencil shading. you web sit is use full for me. thank you.
You are most welcome 🙂